
Choosing a Plastic blind drain is not just a matter of picking a pipe and covering it with gravel. The right system must suit the soil, expected water flow, installation depth, and available outlet. A wet garden bed, a sloped driveway, and a retaining wall each create different drainage demands. Small details matter. A crushed section or poorly wrapped fabric can let fine soil enter the core and reduce its capacity over time.
This guide follows a practical reminder from fictional drainage consultant Alex Morgan: “Match the drain to the soil and water, not just the price.” The quotation is illustrative, not a sourced statement from a real industry expert. The seven tips will help compare core shape, compressive strength, filter fabric, flow capacity, connection fittings, installation needs, and supplier documentation. Look for clear product specifications, including test conditions, rather than relying on broad claims. Ask how the drain performs under the load and soil conditions at your site. Then check whether its dimensions and outlet arrangement fit the planned trench. A product can look sturdy in a catalog and still be wrong for a narrow, clay-heavy run. That is easy to overlook. Even experienced installers can miss a detail when specifications are vague, so verify them before purchase.
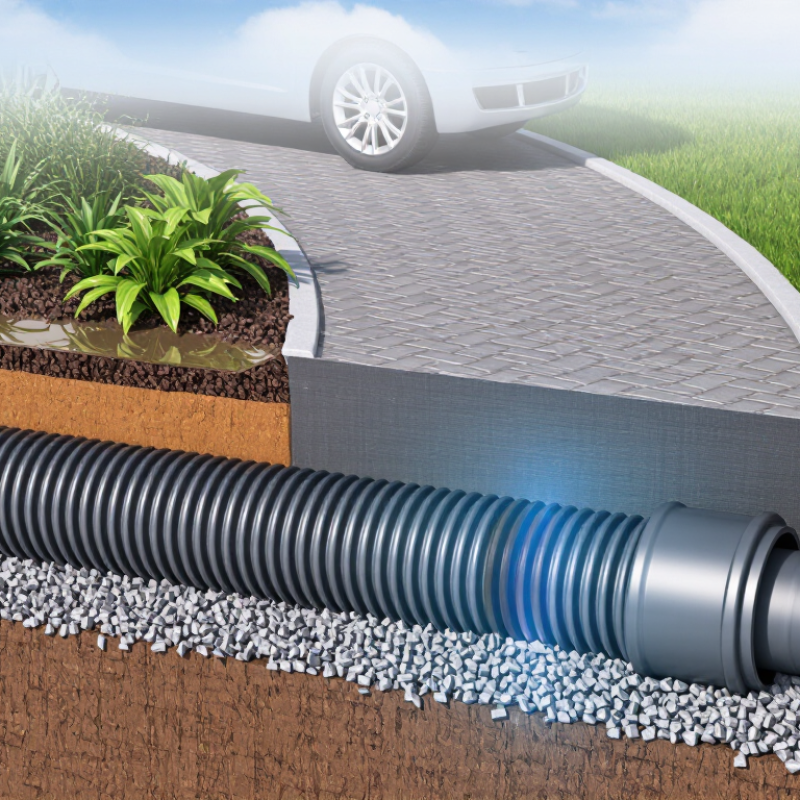
A plastic blind drain is a buried drainage path that collects and carries water out of soil. Unlike an open ditch, it stays below the surface. Many systems use a plastic drainage core wrapped in filter geotextile; some designs also include perforated pipe. Water seeps through the surrounding soil and fabric, enters the core, then moves toward an outlet. The exact construction varies, so “plastic blind drain” is not always used for one standard product. The Federal Highway Administration’s Geosynthetic Design and Construction Guidelines explains that geocomposite drainage capacity should be assessed under expected pressure and flow conditions. A catalogue flow rate alone may not reflect performance in compacted soil.
The volume can add up quickly. The U.S. Environmental Protection Agency estimates that one inch of rain on a 1,000-square-foot roof produces about 600 gallons of runoff. That is substantial. A drain near a foundation or retaining wall must therefore have a reliable outlet, not just a place for water to collect. Check the soil type, expected water load, installation depth, and filter compatibility before choosing a system. Fine silt can clog an unsuitable filter, while heavy soil loads can restrict flow through the core. A practical field check is to confirm that the outlet remains clear after backfilling. I would still verify the design against site conditions; a neat-looking drain can underperform when the discharge point is overlooked.
Before choosing a plastic blind drain, map where water collects after a storm. Look for dark soil, algae, softened paving, and runoff marks. These clues matter. Measure the affected area and note whether water comes from a roof, slope, or saturated ground. Each source creates a different flow rate. Do not judge capacity by puddle size alone; a shallow pool may hide a high water table.
Check the soil with a small test hole. Clay often drains slowly, while sandy soil can release water quickly and carry fine particles into the trench. Note seasonal groundwater levels, too. Estimate the likely inflow, then compare it with the drain’s rated capacity and installation guidance. Guesswork is tempting. A visual check helps, but it cannot replace a proper site assessment where conditions are complex.
Confirm that the outlet sits low enough for reliable discharge, and check the route for roots, buried services, and areas where water could collect again. Consider surface loads as well: a drain beneath a garden path faces different pressure from one beneath vehicle access. Use suitable filter fabric and aggregate to limit soil entry, following the product’s specifications. If the outlet level or soil behavior remains uncertain, pause and get a drainage professional’s assessment before digging.
| Tip | Assess on Site | What to Check | Selection Guidance |
|---|---|---|---|
| 1. Identify the water source | Determine whether the problem comes from groundwater, seepage, surface runoff, or a combination. | Observe wet areas after rain, seasonal groundwater levels, water entering from slopes, and any existing drainage outlets. | Match the drain layout to the source. A subsurface drain can intercept seepage, but it should not be treated as a substitute for surface grading or stormwater control where those are needed. |
| 2. Understand the soil and surrounding aggregate | Review soil type and particle-size information where available; note whether the soil is sandy, silty, clayey, or mixed. | Fine-grained soils can migrate into a drain if the filter system is unsuitable. Check the proposed gravel or drainage aggregate gradation and the soil’s particle-size distribution. | Select a compatible geotextile or filter arrangement based on soil conditions and project specifications. Do not assume one fabric suits every soil; seek a geotechnical review for critical or fine-grained sites. |
| 3. Estimate the required drainage capacity | Consider the area contributing water, expected inflow, groundwater conditions, and the consequences of water buildup. | Use project-specific hydrologic and hydraulic calculations where required. Compare calculated demand with the product’s documented flow capacity under the applicable installation and loading conditions. | Choose capacity from verified technical data, not from appearance or a nominal product label alone. Allow for relevant reductions caused by soil intrusion, compression, or long-term service conditions. |
| 4. Check the route, fall, and discharge point | Survey the proposed alignment, available elevation change, bends, and the location of a lawful, reliable outlet. | Confirm that water can flow to an outlet without low points that trap water. Check outlet protection and whether the receiving system can accept the expected discharge. | Set the drain gradient and outlet details to the design requirements and product instructions. There is no single slope suitable for every site; obtain approval before connecting to public or regulated drainage systems. |
| 5. Account for burial depth and external loads | Identify the planned cover depth and whether the drain will be beneath roads, slabs, equipment, or other loaded areas. | Review compressive or load-resistance data at the intended depth and installation condition. Consider construction traffic, backfill placement, and the possibility of point loading. | Use a product and protective installation detail rated for the design loads. Keep heavy equipment off inadequately covered drains during construction, following the project specification and manufacturer instructions. |
| 6. Evaluate groundwater, chemistry, and durability | Consider whether the drain will remain wet, be exposed to changing water levels, or contact chemically aggressive soil or water. | Check the plastic material’s documented resistance to the expected soil and water conditions, along with temperature limits and any project-specific durability requirements. | Use technical documentation to verify suitability for the site environment. Where contamination, unusual chemistry, or long design life is involved, request specialist review rather than relying on a general material description. |
| 7. Plan installation, inspection, and maintenance | Check whether the drain can be installed continuously and whether the outlet and any cleanouts will remain accessible. | Review trench dimensions, bedding or aggregate requirements, filter overlaps, connections, outlet screens, and access points. Identify possible sediment entry or blockage sources. | Follow the installation specification and keep access points clear. Provide cleanouts or inspection access where appropriate, and establish a practical inspection plan for outlets and accessible components. |
Design note: Drain type, filter selection, hydraulic capacity, gradient, and structural requirements depend on site-specific soil, groundwater, loading, and discharge conditions. Confirm critical design values with qualified project professionals and current product documentation.
7 Tips for Choosing a Plastic Blind Drain
Choosing the Right Material, Size, and Flow Capacity
A plastic blind drain works best when its material and dimensions match the site. Check the soil, expected water volume, burial depth, and exposure to sunlight during installation. Polyethylene and polypropylene are common options, but stiffness and impact resistance vary by product. Fit matters.
Tip: Match the drain’s diameter to the length of the run and the amount of water to remove. A narrow channel may struggle after heavy rain, while an oversized one can cost more and be harder to install. Check the product’s flow rating and installation guidance, not diameter alone.
Tip: Look at the filter wrap or surrounding geotextile as carefully as the plastic core. Fine silt can clog openings; coarse gravel may let soil migrate into the drain. Choose a filter suited to the local soil, and keep the outlet clear. Check the slope, too. Even a good drain can hold water if the pipe sags. I’ve seen that detail overlooked on otherwise tidy jobs, and it is worth rechecking before covering the trench. Ensure the drain can handle expected peak flow, with a sensible margin for storms and partial blockage.
Larger diameters can carry more water. These estimates use Manning’s equation for a smooth circular pipe flowing full, with a 1% slope and Manning’s n = 0.011. Actual blind-drain capacity depends on perforations, filter fabric, soil conditions, installation, and outlet design. Check product specifications and local engineering requirements before selecting a drain.
A plastic blind drain must withstand the soil and loads around it, not just look sturdy in a sample. Check its compressive-strength rating against the expected cover depth and surface traffic. Soil acidity, salts, and temperature can also affect plastic over time, so review the product’s stated limits. Press the panel gently; flex can reveal something, but it cannot replace specifications. Check the edges.
Compatibility matters too. Match the drain’s width and flow capacity to the area’s runoff and available outlet. Confirm that its fabric wrap suits the soil: fine particles may pass through a coarse filter, while a poorly matched fabric can clog. If the drain connects to a pipe, compare diameters and fittings before ordering. Guessing here can mean awkward cuts later.
Installation needs deserve a close look. Measure the trench, check the planned slope, and make sure the outlet sits lower than the collection area. Leave enough room for bedding material and the specified backfill. Dry-fit sections and fittings before covering them, then check that joints stay aligned. It is tempting to focus on the drain itself; I’d also plan access to the outlet, since a buried connection is harder to inspect. Small details matter.
Choosing a plastic blind drain starts with the soil, not the pipe. In sandy ground, water moves readily, while fine silt can clog openings over time. Corrugated flexible pipe is easy to route around trees and tight corners. Rigid perforated pipe holds a straighter grade, which can make installation and cleaning more predictable. Neither option is best everywhere.
Compare the hole pattern, pipe stiffness, and available filter materials. A geotextile sock may help in silty soil, but it can also clog if the fabric is poorly matched to the soil. Clean, appropriately graded gravel around the pipe is often just as important.
Check the expected water flow and burial depth, then confirm the pipe’s load rating if vehicles will pass overhead. Small detail. The outlet matters too: water needs a stable path away from the area, not a low spot where it can collect again.
I would double-check the slope with a level before covering the trench; judging it by eye is easy, and not always reliable. Local soil conditions vary, so a small test trench can reveal more than a product description.
Contact Us